Category: Greenspector Tutorials

What is the correlation between eco-design and editorial sobriety?

Reading Time: 4 minutes

An ecodesign approach for digital services can only be successful if all project stakeholders are involved at all stages of the project lifecycle. Sometimes, despite all the efforts made to apply eco-design principles to the creation of a website, environmental impacts can increase due to elements outside the defined scope. In particular, it’s essential to involve those who will be producing content for the site. It’s not all that simple. Some best practices can be technically automated, while others require you to keep in mind all the content proposed, as well as its durability.
This article suggests a number of best practices aimed at facilitating content management with a view to reducing the impact (environmental and otherwise) of proposed content.

Further reading

Ferréole Lespinasse has already written extensively on this subject: https://www.sobriete-editoriale.fr/
The INR (Institut du Numérique Responsable) reference framework has a category dedicated to content: https://gr491.isit-europe.org/?famille=contenus
The same goes for the RGESN (Référentiel Général d’Ecoconception de Services Numériques): https://ecoresponsable.numerique.gouv.fr/publications/referentiel-general-ecoconception/#contenus

Best practices in editorial sobriety

Integrate as little non-textual content as possible

Context

Each piece of integrated content will generate requests and data transfers. It is therefore important to integrate as little as possible, while maintaining the attractiveness of your publications. Once only essential content remains, it’s time to integrate it as efficiently as possible (see below).

Most often, at impact level: video > podcast > moving image > static image > text

Please note that animated GIF images can be very large, posing accessibility problems.

The INRIA (Institut national de recherche en informatique et en automatique) MOOC offers a simple activity to help you understand these impacts.

How can we do it?

  • Limit the number of contents, taking into account their respective impacts
  • Avoid purely decorative content as much as possible (e.g. stock images or carousels)
  • Keep accessibility in mind

Reduce the weight of videos

Context

Especially in the age of social networks, video is often favored as a communication channel.

Today,video represents 60% of global data flows

How to do it?

Reduce the size of audio files

Context

Particularly with podcasts, audio content is multiplying on the web.

How to do it ?

  • Favor MP3, OGG or AAC formats
  • Use audio files that are as concise as possible
  • Rather than directly integrating the content on the page, integrate a clickable thumbnail leading to it

Reduce the weight of images

Context

Overall, on web pages, images are the source ofthe majority of data transferred [EN]

How to do it?

  • Favor the Webp format and other formats adapted for the web
  • Offer images with a size and quality adapted to user terminals
  • Optimize images using a tool (example:Squoosh
  • Load text by default and image only on demand

Tutorial (in English) on image optimization.

Limit the impact of third-party content

Context

It is easy to integrate content from other sites (Youtube/Dailymotion videos, Twitter/Facebook/Instagram/etc. messages or feeds).

Their direct integration often results in numerous requests (especially trackers) and data transferred.

How to do it?

Adopt sober management of publications

Context

Beyond the design of each publication, it is important to keep in mind all the publications available. The goal here is to keep content relevant and up-to-date. The point is to prevent the content from being drowned out in the crowd, which in turn helps improve natural referencing.

How to do it ?

  • Rely on concrete indicators: number of visits, number of arrivals on the site via this page, bounce rate, etc.
  • Update older posts that are still of interest. Possibly take advantage of this to change the format: the video becomes an article
  • Combine publications similar in their themes: informative articles are aggregated into a reference article
  • Delete posts that are no longer seen or no longer relevant (outdated content or relating to past events)

To go further, it is also possible to:

  • Set an expiration date for the publications created (examples: hot content VS cold content, unpublish date for temporary content)
  • Audit a site’s publications [EN]
  • Publish content in a reasoned and relevant way, particularly for its distribution on social networks and in newsletters. The latter must themselves be subject to an eco-design and accessibility process.This subject alone could be the subject of an article.

Propose explicit labels for links

Context

When browsing content, it is common to come across links that enrich the content in question. In order to avoid unpleasant surprises for users, the labels of these links must be as explicit as possible. The interest in the user experience is obvious but it is also a question here of preventing the user from loading content which is not useful to them or which their terminal or their internet connection does not allow them to use in specific situations. good conditions.

The criteria for this good practice are mostly derived from the rulesOPQUAST (OPen QUALITY STANDARDS). It is appropriate here to emphasize again the need to offer accessible links (but also more generally content).

How to do it?

Conclusion

We have discussed here what can be done to ensure that content is as light as possible. If certain actions rely mainly on contributors, it is ultimately important that thecontent management tools such as CMS (Content Management System) integrate tools to assist contributors. This may involve, for example, automating certain technical optimizations, visualizing the environmental impacts of the content produced but also facilitating the implementation of a more global content management approach (expiry of documents, visualization of consultations, etc. .). Some publishers have already taken the initiative to initiate such an approach; it remains to be hoped that it will become systematic.


How to estimate the battery life of a smartphone in less than one hour?

Reading Time: 6 minutes

Knowing the battery life of a smartphone is important because it’s one of the first purchase criteria. This is the more critical for the fleets of devices (in B2B mode) for the companies. In fact, poor autonomy will lead to a productivity decrease or customer insastisfactions. It’s therefore necessary to have a good strategy to choose its devices as well as the applications that will be hosted on it.

Traditional approaches to estimate battery life

A first approach is to rely on data provided by manufacturers. However, the limit of this approach is that those data are based on usage scenarios that aren’t necessarily representative of yours. The risk is to have a reality of autonomy far removed from what you have estimated. Especially since some features (such as taking pictures for example ..) may not be optimized on a certain type of smartphone and will be very used in your use. This criticism is also valid for tests carried out by external laboratories.

A second approach is to perform tests on real devices and perform the target scenario. Tools exist to launch benchmarks automatically but you can also perform your tests manually. The advantage is to have a realistic autonomy. The only problem is that these tests are very time-consuming. And that doesn’t give the right to the error. Indeed, if you want to change a parameter on the smartphone (brightness …) or add an application to test, you must restart the entire test campaign.

One last approach is to let users do the testing. You wait for your users feedback or you use the fleet deployment tools (MDM) to trace the information. This has the advantage of being inexpensive, the disadvantage is that there is a hidden cost: if there is a problem, there will inevitably be insatisfaction and unproductivity generated. And that forces you to choose a device that may need to be replaced.

The innovative approach of GREENSPECTOR

To meet this need to control the battery life of devices (and to choose the right device as soon as possible), GREENSPECTOR proposes an approach based on on real but unitary measurements with a projection algorithm. The process consists of 3 stages:

  • Measurement of the main features on the devices to be evaluated
  • Configuring a target scenario
  • Data projection and analysis

Use case

We want to estimate the autonomy of a traditional use on a smartphone Samsung Galaxy S7. The use can be a use in company but also an intensive personal use:

  • 30 minutes of internet browsing
  • 30 minutes of social network
  • 30 minutes of telephone conversation
  • 30 minutes of taking pictures
  • 10 minutes of video recording
  • 30 minutes of e-mail
  • 30 minutes of videoconference
  • 30 minutes of Microsoft Word
  • 10 minutes train reservation
  • 30 minutes of geolocation

This scenario is deliberately generic but we could add a specific application or an exotic use …

Functionality measurement

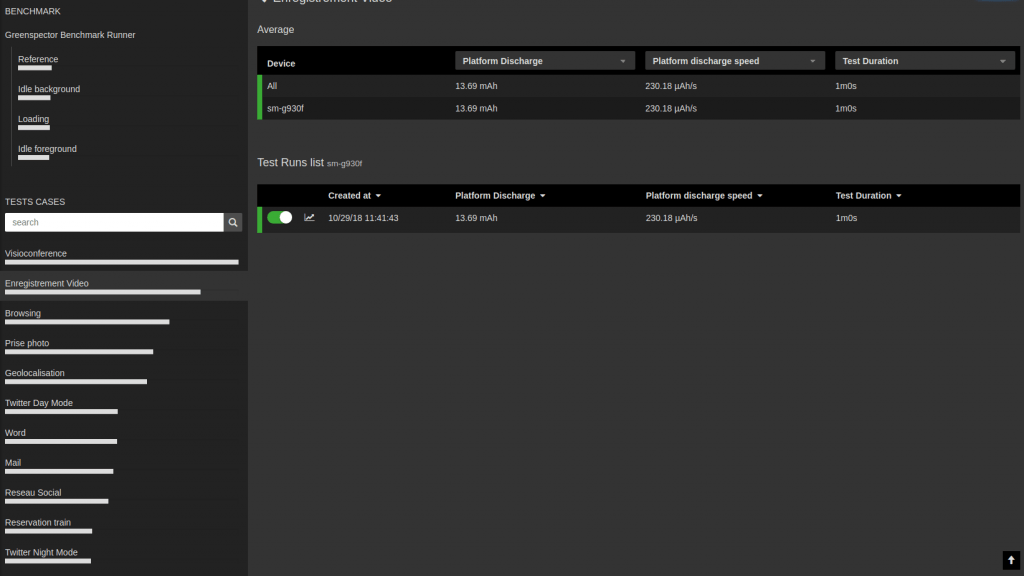
We use the module Free Runner of GREENSPECTOR which allows perform manual tests. These actions can be empowered but in the approach of this article, we focus on rapid testing oriented exploratory tests. If a larger benchmark is needed, automation would be of interest.

For each step of the scenario (navigation, taking a photo …), we launch the Free Runner module and we carry out a scenario representative of a real use over 1 minute.

The GREENSPECTOR module sends the measurements directly to the GREENSPECTOR server. In the end it took us just over 10 minutes to get all the measurements. If we want a little more precision (or representativeness), we can do more iterations.

At this stage, the most consuming features or applications can be identified.

Implementation of the budget strategy

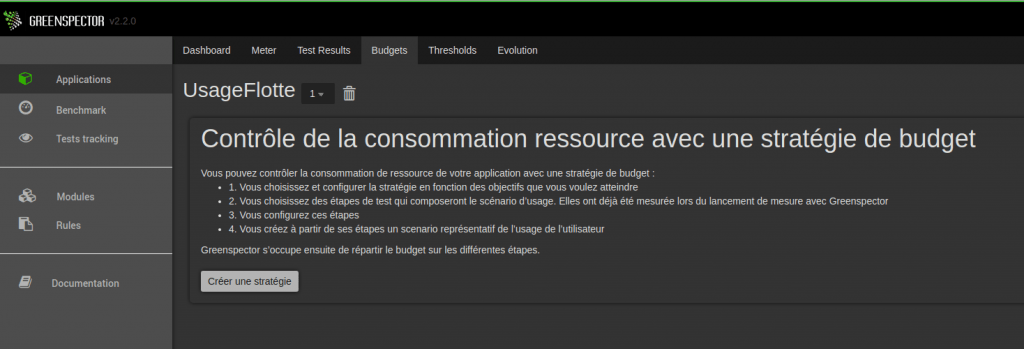
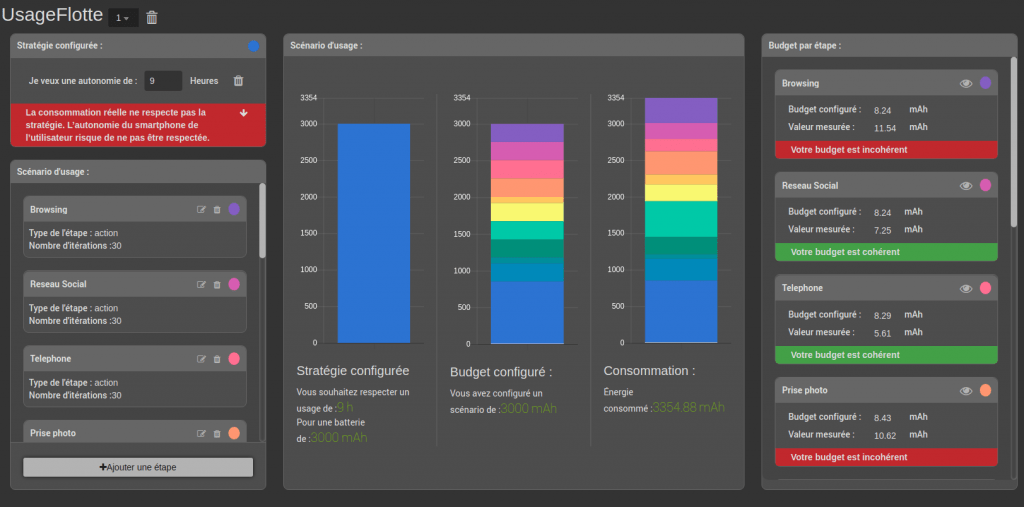
Within the GREENSPECTOR interface on the Budget tab, you will be able to initiate a projection of autonomy:

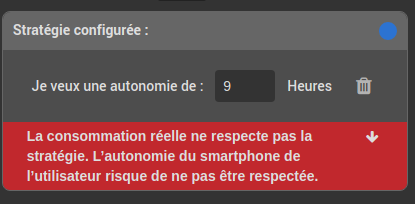
You will be guided in the budget configuration. A first step is to specify the autonomy you want to achieve. If you’re on a fleet of devices, you probably want your user to have at least 9 hours of battery life to finish the day without recharging the phone.

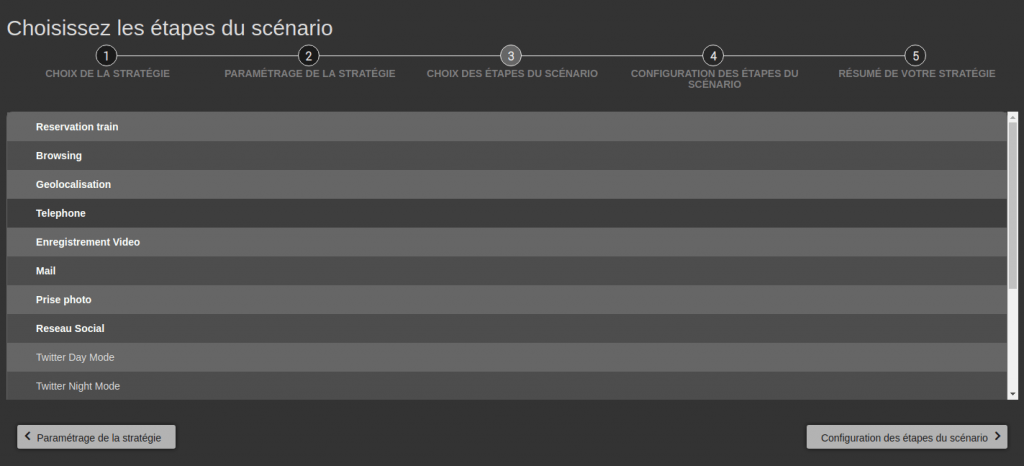
GREENSPECTOR then offers you the possible steps of the scenario. They come from the measurements you have done previously.

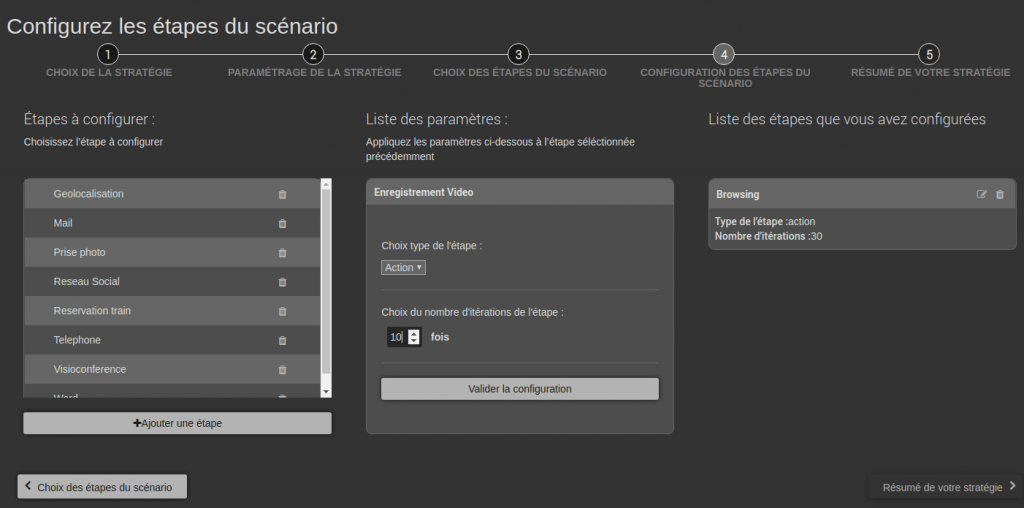
The most complicated step for you now is going to be to specify how many times or how long you want the action to happen. For example, we use 30-minute target durations, so you have to enter this data for each step. No worries, this can be changed later.

You can then validate and let the algorithm calculate. No time to have a coffee, the results of the projections are immediate:

Analysis of the results of the algorithm

The first warning in the window means that the projection of battery life according to your scenario and the real measures allow to say that the autonomy of 9 hours will not be respected.

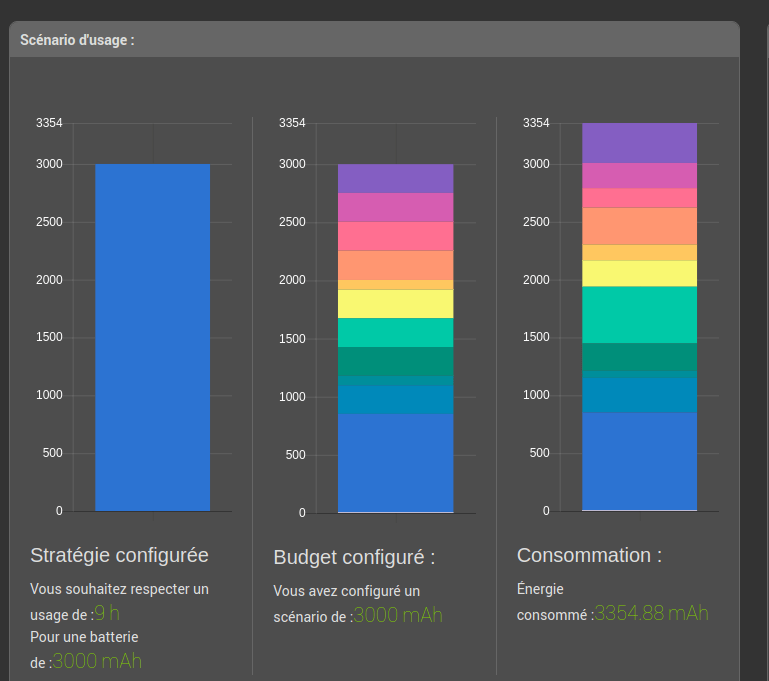
This information is found in the projection graph:

  • The 1st bar is the available capacity of usable energy over 9 hours: The capacity of the Samsung Galaxy S7 phone is 3000 mAh.
  • the 2nd bar is the energy distribution (the unitized bugdets) by functionality if you want to respect the autonomy.
  • The 3rd bar is the consumption projection associated with real measures.

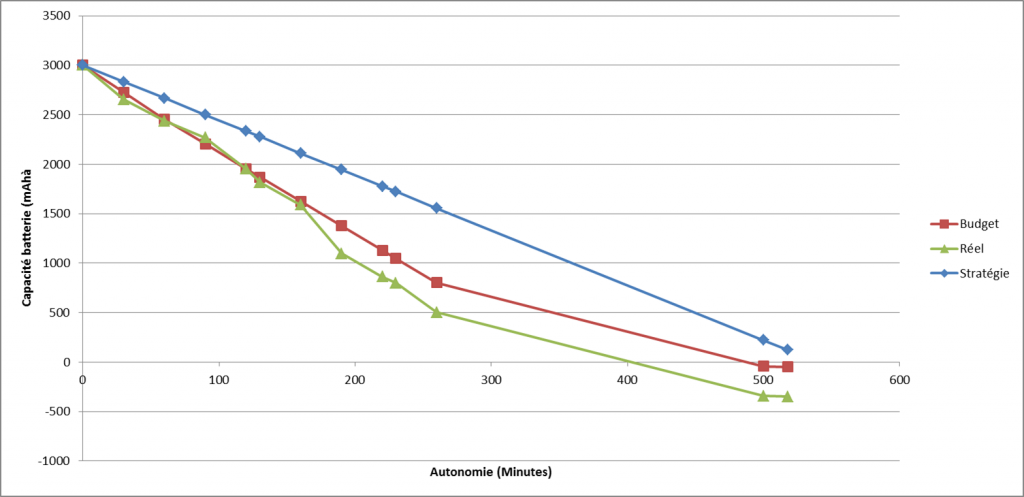
It can be seen, the actual measured consumption is 3300 mAh while the capacity of the phone is 3000 mAh. We will see below what to do to correct this.

The notion of unit budget appears on the graph and on the right-hand side. This is the ideal distribution of energy consumption on each feature to respect autonomy. Here are the main principles of the algorithm:

  • To stay close to a real use, the algorithm adds a period of inactivity that corresponds to what the user would do between his actions (Idle foreground)
  • A deep sleep period is added which corresponds to a long-term inactivity of the phone (Idle background)
  • The idle periods that you will define (for example an idle corresponding to a lunch break) will be associated with a budget that is based on the reference consumption of the phone
  • To the actions, will be assigned a budget which corresponds to a maximum consumption of x2 the reference consumption.

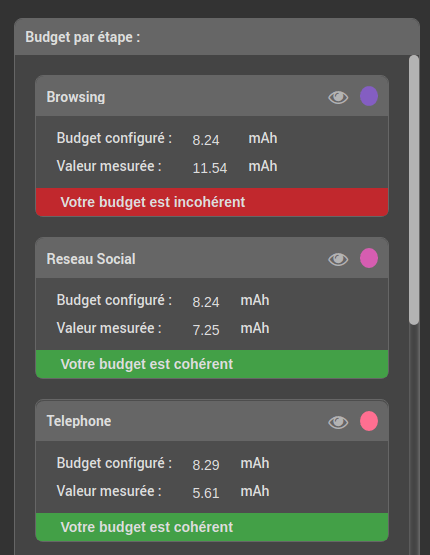
In the end, the unit budget of each action is the amount of energy that a unit action must not exceed. Like that, you can check against the actual measurement if the action consumes too much:

We see here that the consumption of navigation is important and exceeds the budget. This feature contributes to the lack of respect of the desired battery life.

In the end, you can analyze the data outside GREENSPECTOR and for example visualize the battery discharge curve:

How to obtain a correct autonomy?

A first axis is to replace the phone. Indeed, you can choose the wrong device for your use. Ideally, the projections of autonomy will make it possible to carry out a benchmark to avoid a change too late.

Then maybe the scenario isn’t enough realistic. It will then be necessary to rethink the use: is the video conference via mobile really viable? Unfortunately, this approach is generously dismissed because we always want more digital service on the devices. The following approaches will then be more appropriate.

The unit budget will be useful to apply a better strategy:

  • On system applications (camera for example), we will study the possibility of setting the application differently to find optimizations and reduce consumption to stay within the defined budget.
  • For other applications like browsers we will be able to benchmark alternative applications. It’s likely, for instance, that videoconferencing solutions aren’t all equal in terms of energy consumption.
  • For applications developed by a third party and you master, you can incorporate a criterion in the specifications to meet the desired budget.
  • Finally for applications or websites developed internally, you can integrate GREENSPECTOR and budgets in the software factory to optimize the consumption of your applications as soon as possible and thus detect energy and energy problems. performance before your users.

Measure the resource consumption of an application via automated tests

Reading Time: 2 minutes

Some indications are needed to start a good energy and ressource measure with GREENSPECTOR. Three notions must be taken into account: where will be run the tests (WHERE), what are the tests that I’m going to run (WHAT) et how am I going to run these tests (HOW).

Several ways to launch these tests (HOW) are available:

  • From the GREENSPECTOR web interface
  • From the command line with the Test Runner
  • From the command line with the CLI
  • Manually with the Free Runner Test
  • From the Jenkins Plugin

Measure the resource consumption of an application via automated tests

To better characterize the consumption of an application, you can integrate the GREENSPECTOR API into your automated tests. You will be able to run tests from your usual environment or from the GREENSPECTOR Android Test Runner on your local phone. After that, you’ll be able to use his tests on the Power Test Cloud.

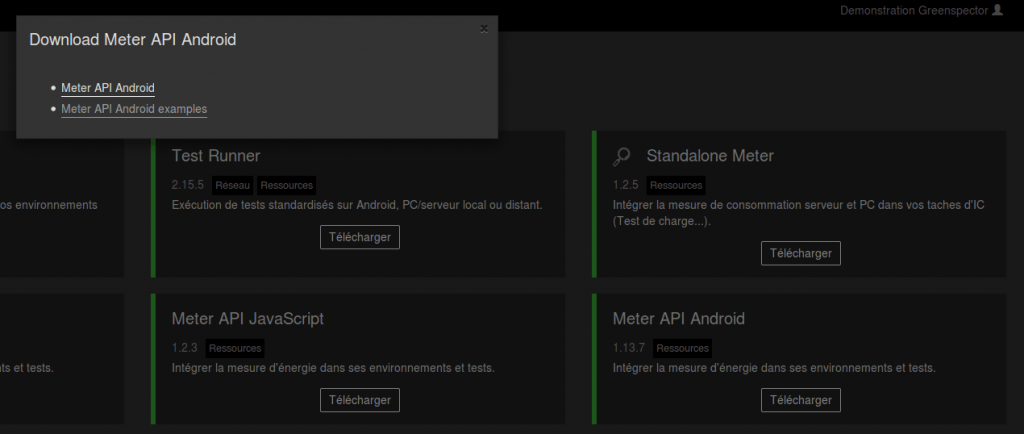
1) Download the Android API GREENSPECTOR (Meter API Android) on the list of modules and examples.

2) Install the AAR library in your Maven directory:

mvn install:install-file
-Dfile=greenspector-probe-android-[version].aar
-DgroupId=com.greenspector.probe.android
-DartifactId=greenspector-probe-android
-Dversion=[version]
-Dpackaging=aar

3) Unpack the examples

4) Open the UIAutomator project in Android Studio

5) Open the GreenspectorUIAutomator.java file and edit the following information:

  • APPLICATION: Same name as that set in the GREENSPECTOR interface;
  • VERSION: Same version as configure in the GREENSPECTOR interface;
  • URL: URL of your instance “https://my-instance.greenspector.com/api“;
  • PRIVATETOKEN: Your token found in your preferences from your GREENSPECTOR interface

6) Connect your phone to the same Wifi network as your platform

7) In a CLI, type the following command:

adb tcpip 5555

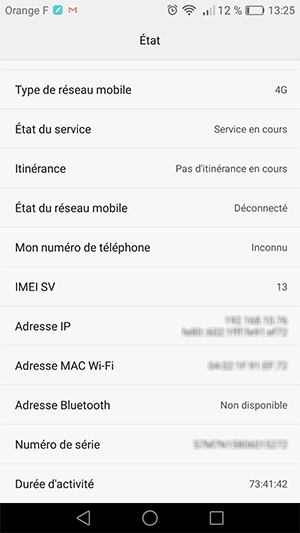
8) Unplug the cable and find the IP address of your smartphone in the settings.

9) Connect to phones with the following command:

adb connect [IP]

10) Right click on the class GreenspectorUIAutomator and start the test (Run …).

The test is launched on your mobile, you will find the results of your measurements within your GREENSPECTOR interface.

Discover our others tutorials :

Launch application consumption measurement from your PIC / software factory

Reading Time: 2 minutes

Some indications are needed to start a good energy and ressource measure with GREENSPECTOR. Three notions must be taken into account: where will be run the tests (WHERE), what are the tests that I’m going to run (WHAT) et how am I going to run these tests (HOW).

Several ways to launch these tests (HOW) are available:

  • From the GREENSPECTOR web interface
  • From the command line with the Test Runner
  • From the command line with the CLI
  • Manually with the Free Runner Test
  • From the Jenkins Plugin

Measure the consumption of an application from your PIC / software factory

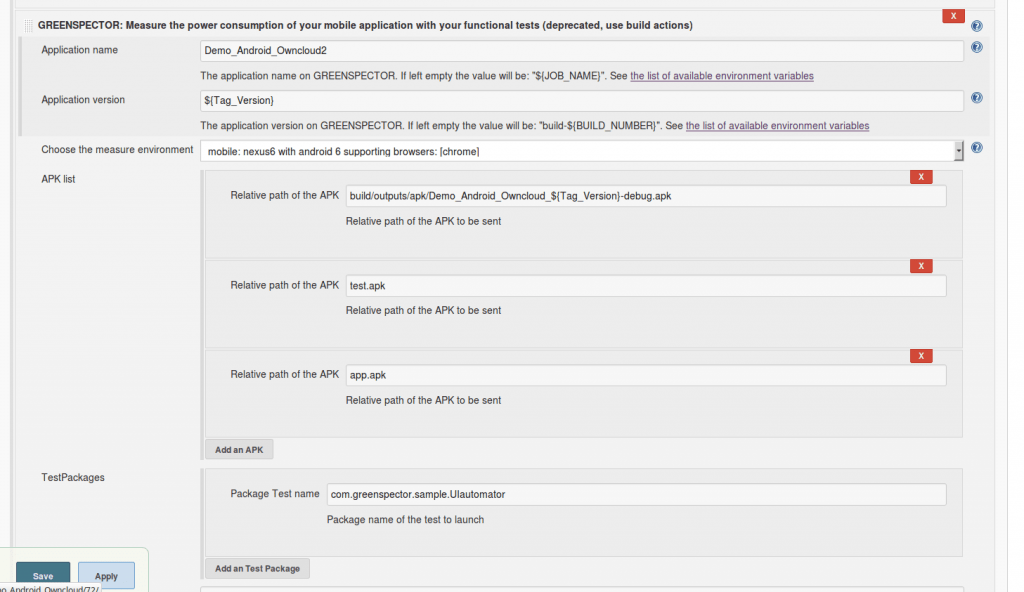
Once GREENSPECTOR integrated in your automated tests, it’s possible to launch them on a GREENSPECTOR test bench from a Jenkins plugin or from the CLI installed on your PIC.

1) If not already done install the CLI (See tutorial “Benchmark an application on the Power Test Cloud“)

2) Open a command line at the root of the UIAutomator project (Perform actions 1 to 7 of the previous tutorial “Benchmark an application on the Power Test Cloud“)

3) Submit the tests to the cloud using the following command:

gspt tb ct --apkFiles app/build/outputs/apk/app-debug-androidTest.apk --apkFiles app/build/outputs/apk/app-debug.apk --testPackages com.greenspector.sample.UIautomator --monitoredPackage com.android.chrome

4) The job can be followed in the GREENSPECTOR interface as in the tutorial“)

Note: The principle of this launch applies in the Jenkins Plugin

Discover our others tutorials:

Manually explore an application with the Free Runner Test

Reading Time: 3 minutes

Some indications are needed to start a good energy and ressource measure with GREENSPECTOR. Three notions must be taken into account : where will be run the tests (WHERE), what are the tests that I’m going to run (WHAT) and how am I going to run these tests (HOW).

Several ways to launch these tests (HOW) are available:

  • From the GREENSPECTOR web interface
  • From the command line with the Test Runner
  • From the command line with the CLI
  • Manually with the Free Runner Test
  • From the Jenkins Plugin

Manually explore an application with the Free Runner Test

It is possible to carry out manual tests on your phone. The Free Runner Test is an Android application that allows you to perform resources measurements at the same time as you perform your manual tests.

1) If this is not already done, create an application from the GREENSPECTOR interface.

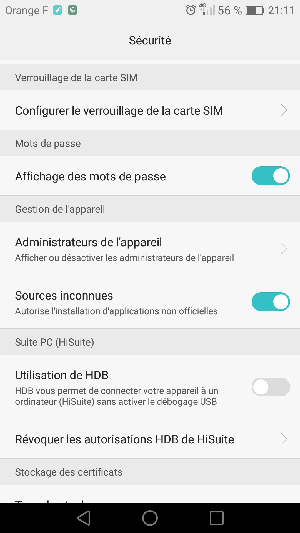
2) On your phone, allow the installation of external applications to the Store: in the settings Advanced Options > Security > Unknown Sources.

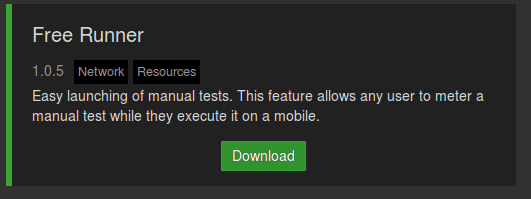
3) Go to the modules page from the Greenspector interface and click on the Free Runner.

4) Follow the installation of the application on your phone.

5) Start the Free Runner Test application once it is installed.

6) Get your token in your preferences within the GREENSPECTOR interface.

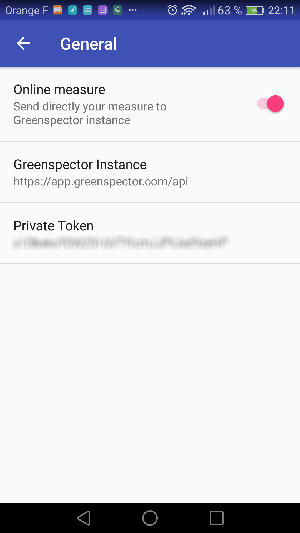
7) Access the settings of the application (Parameters > General) and configure the information related to your GREENSPECTOR instance (the url of your instance: https: //[instance]/api) as well as your token).

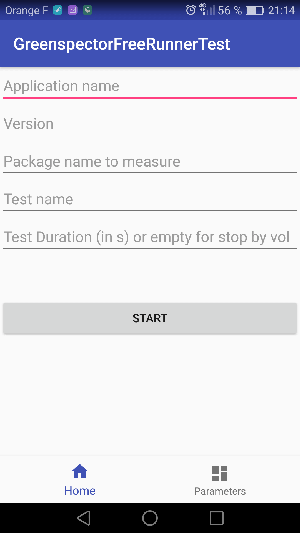
8) Return to the Free Runner Test application home page and enter the information

  • Application Name and Version: Same information as the app created from the GREENSPECTOR interface
  • Package name to measure: Optional
  • Test name: Define a name that represents the test you want to do (Purchase, Search…). You will find it in the GREENSPECTOR interface.
  • Test Duration: You can set a maximum test duration in seconds. At the end of this preset time, the measurement will stop automatically. You can also stop the measurement by simultaneously pressing the volume down and up keys on your phone.

9) When ready, press Start. The Free Runner Test application goes into the background and the measurement starts.

10) Perform your actions on the app you want to measure.

11) Once the measurement is finished, the Free Runner Test application returns on the foreground. The measurement results are then available in your GREENSPECTOR web interface.

Discover our others tutorials:

Benchmark an application on the Power Test Cloud

Reading Time: 3 minutes

This article is part of a tutorial series that will explain different measurements’ use cases

Some indications are needed to start a good energy and ressource measure with GREENSPECTOR. Three notions must be taken into account: where will the tests be run (WHERE), what tests am I going to run (WHAT) et how am I going to run these tests (HOW).

Several ways to launch these tests (HOW) are available:

  • From the GREENSPECTOR web interface
  • From the command line with the Test Runner
  • From the command line with the CLI
  • Manually with the Free Runner Test
  • From the Jenkins Plugin

Benchmark an application on the Power Test Cloud

The easiest way to get started is to use an available smartphone from the Power Test Cloud (WHERE) and launch a benchmark test (WHAT). The advantage of the test bench is to have a device immediately available and configured, which allows you to obtain very stable measurements. Depending on your GREENSPECTOR license, it is possible that the test bench is installed within your premises (and not in the cloud). The benchmark makes it possible to simulate the application in different states (launching, inactivity, setting in background task…). To run the tests, we will use the CLI</ span> on an application.**

1) From the GREENSPECTOR interface, create a MyFirstApp app with version 1

2) Get your app as an APK or download one from a site like Apkpure

3) Download the CLI on your platform and put it in a directory. You can rename the file (e.g. gspt)

4) You can put the path of CLI in your path to simplify the launch

5) Open the command line in the directory where the application is located and launch the command

gspt init

The command prompt asks you for the token. You will find it in your preferences within the GREENSPECTOR interface.

6) Launch the command line that initializes a GREENSPECTOR local project

gspt ipc initprojectconfiguration --application MyFirstApp --version 1

7) Launch the following command to choose a smartphone

gspt testbench set-environment

8) Launch the benchmark with the following command:

gspt testbench benchmark-apk --apkFiles Instagram_v33.0.0.11.92_apkpure.com.apk  --iterations 3

9) You can see the progress from the GREENSPECTOR interface in jobs

10) When the job is finished, you can see the results:

Tips : Each time you use the CLI, you can add –help for options. To make the input faster, you can use the command alias (-a instead of –application for example)

Discover soon our others tutorials :

Integrate Greenspector results into its dashboards thanks to an API

Reading Time: 2 minutes

Launch measurements and have recommendations for improvement on the Greenspector dashboard is good, but integrate these results in its software factory and its own dashboards, it’s better. It is now possible thanks to the Greenspector API.

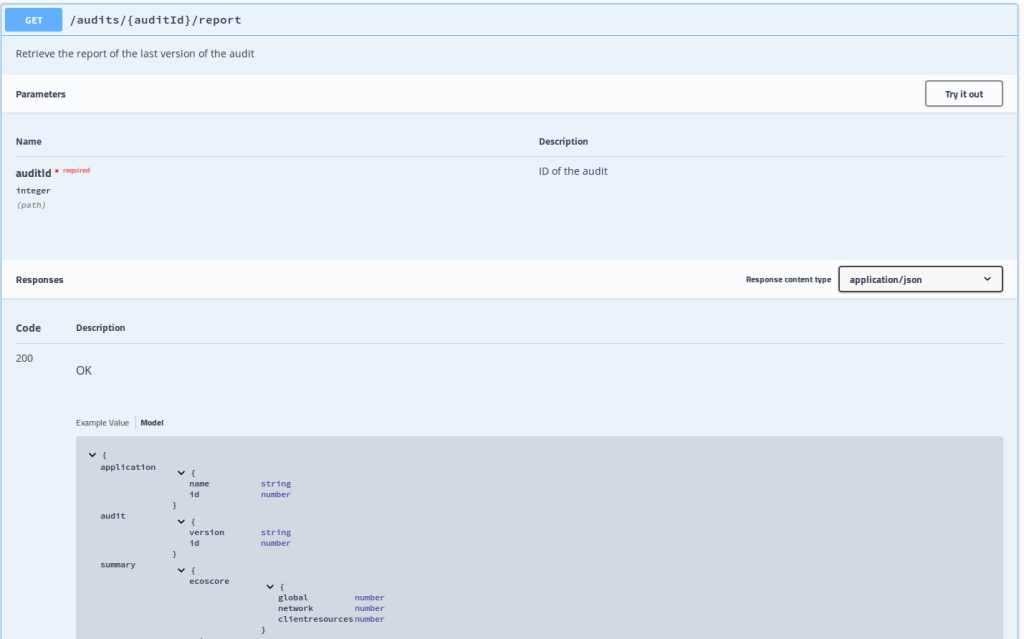
The API documentation is available at https://[URL of your Greenspector instance]/api/ui

You can use this documentation to test the API. For this, it’s necessary to configure your token access. It is available in your preferences in the Greenspector interface.

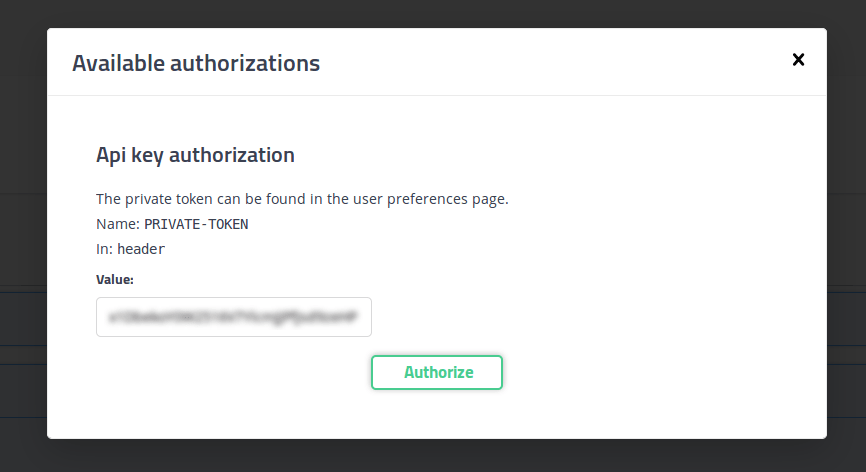
In the Swagger interface, click Authorize.

You can then paste the token:

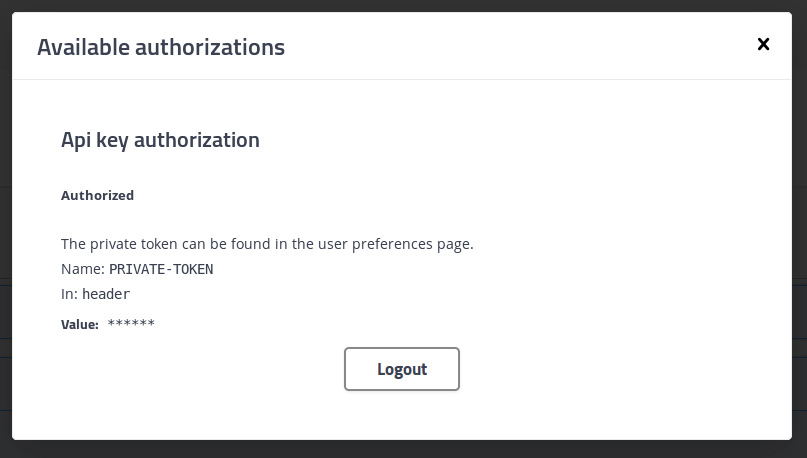
Once validated, you are connected and can disconnect at any time.

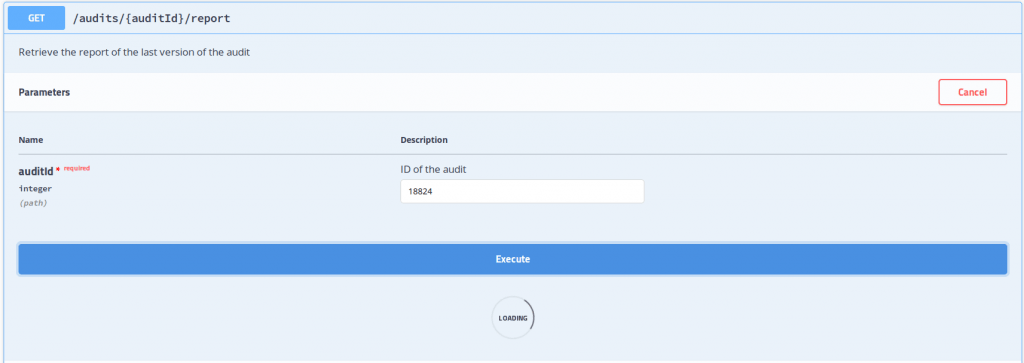
To test the API, you must retrieve the ID of the report to retrieve. It is available in the dashboard URL (Figures behind /version/)

You can then enter the ID in the Swagger interface and run the query.

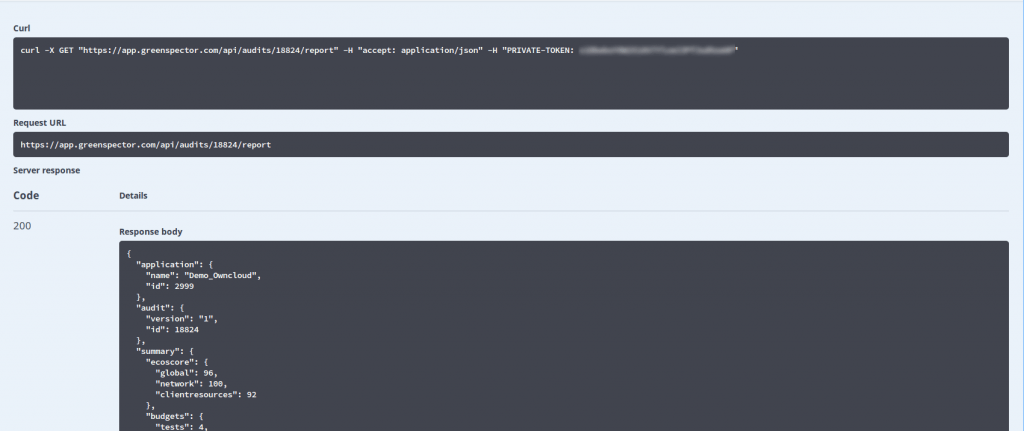
The return code 200 indicates that everything went well. The result of the JSON is displayed.

The curl command can be copied and put in place in your PIC to retrieve the results. For more information on data, the API contract is available in the same page by clicking on the template.

If you still have questions, do not hesitate to contact-us.

Power Test Cloud: how to measure the energy consumption of a web or mobile app when you’re not an expert

Reading Time: 4 minutes

Are you an Android Developer? A Web Designer? Or a non-Developer, just like me? Do you know how much energy is consumed by your website or mobile application? More importantly, do you know how to optimize them to be more efficient?

GREENSPECTOR integrates a functionality which, in just a few clicks, allows you to launch a test and measure energy consumption, hence audit your app: the Power Test Cloud.

Continue reading “Power Test Cloud: how to measure the energy consumption of a web or mobile app when you’re not an expert”