Category: Technical Zone

How to choose the smartphones integrated in your test campaigns?

Reading Time: 2 minutes

Regardless the fragmentation of Android smartphones, it’s necessary to optimize the choice. Indeed, it’s impossible to measure the consumption of resources and energy on all the market devices.

Continue reading “How to choose the smartphones integrated in your test campaigns?”

Launch Appium tests in parallel on several devices

Reading Time: 2 minutes

It’s sometimes required to execute tests in parallel on several devices. In any case, this allows you to speed up you test campaign:

Continue reading “Launch Appium tests in parallel on several devices”

Do not let your network cell rob the battery anymore!

Reading Time: 3 minutes

When it comes to the use of network in mobility, there’s two kinds of applications: those which keep the battery loaded, and those which dig.
In which category does your app fall?

Continue reading “Do not let your network cell rob the battery anymore!”

Hybrid application: how to avoid project failure due to poor performance?

Reading Time: 4 minutes

In a time of digitalization and strong growth in mobility, the development of mobile applications has become strategic for all businesses.

Continue reading “Hybrid application: how to avoid project failure due to poor performance?”

Why is measuring performance with the CPU a mistake?

Reading Time: < 1 minute

In his Upscale 2018 presentation last march, Brendan Gregg, senior performance architect at Netflix, explains why the CPU isn’t a good metric for measuring performance.

Brendan Gregg, senior performance architect at Netflix”
Everyone uses %CPU to measure performance, but everyone is wrong

This is an opportunity for us to revisit what we have been pushing for a long time: How to measure performance and resource consumption reliably?

Brendan Gregg explains that the CPU rate can indicate false information. For instance, a busy CPU doesn’t necessarily indicate that the CPU is busy doing calculations but is waiting for information. It’s therefore necessary to use more advanced tools to analyze what happens in the lower layers of the code. Brendan Gregg even concludes that this problem will get worse with the acceleration of processor speed.

We have observed this phenomenon through our R&D. Indeed, a high CPU rate doesn’t necessarily mean that the CPU is requested and conversely a low CPU could hide overconsumption from another cache.

The problem is even more present in mobility. Indeed, the current platforms are heterogeneous: CPU, GPU, Radio, multiple interfaces… It’s therefore complex to follow the current performance of these platforms and it’s necessary to use various and complex profiling tools.

Our approach at Greenspector is different, we propose to use energy as a more reliable metric. Any component solicited consumes energy, monitoring energy consumption will detect over-consumption of resources.

For more information, we invite you to read our article Why you should measure the energy consumption of your software?.

How to analyze the behavior of my smartphone with Battery Historian?

Reading Time: 3 minutes

At GREENSPECTOR, our R&D teams have been working for several years on the energy measurement of smartphones. Several years of research and innovation that allow us today to offer a unique product to simply measure the energy data of smartphones. However, there are tools that can complete the analysis of the behavior of the battery and the phone. Battery Historian is one of them.

Battery Historian is a tool developed by Google, launched in 2016, which allows one to analyze the behavior of a phone and more precisely to review information and events related to the battery. This is, we will see, an expert analysis tool. Several metrics and insights are available: radio cells, communication… all this correlates with the battery level.

Battery Historian usage tutorial

1) First of all, install Docker. Docker is free software that automates the deployment of applications in software containers. Personally, I am on Ubuntu so I use the quick install scripts:

curl -fsSL get.docker.com -o get-docker.sh
sudo sh get-docker.sh

2) From your command line interface, launch the Docker image:

docker run -d -p 9999:9999 bhaavan/battery-historian

3) You can now access Battery Historian from localhost:9999

You must now retrieve the detailed information of your phone’s system. For this, you must have previously installed the Android SDK and activated the developer mode on your phone.

4) Plug your phone into USB to your PC.

5) From your command line interface, retrieve the phone’s system information file with the following command:

adb bugreport bugreport.zip

6) You can now upload the file bugreport.txt in Battery Historian

You will then get your analysis report:

You can now observe the battery level on the right axis (from 0 to 100%), this level is represented by the black curve. On the left axis and the other lines, you will find all other information about the metrics and insights reported by the system.

Below this graph, you will find statistics of all information about specific applications or system information of your phone. Allowing you an overview of what is happening with your device. For example, you can analyze the impact of a particular application on the battery during use

Our opinion on Battery historian

Battery Historian is a powerful tool that allows you to analyze the behavior of the battery and most importantly understand what is happening in the system. But it is also a complex tool. There is a lot of information and it quickly becomes difficult to find the causes of the discharge. In addition, since the tool is based on the battery level, it is necessary to allow the application you want to analyze to run for a while. It is therefore a useful tool for a detailed analysis of the system but to put in expert hands.

Why should you care about your application’s impact on the end user’s battery life?

Reading Time: 5 minutes

TL ; DR

Smartphones’ battery life has been plateauing for a few years. Manufacturers offer batteries with a greater capacity, users state battery life is one of the main purchasing criteria, and, yet, the average battery life of devices doesn’t increase. Why that, you may ask? Because hardware itself is more powerful, thus more energy-intensive; and also because applications consume more and more resources.

As a consequence, in order to improve the way users perceive their devices, manufacturers point at the most energy-intensive applications, encouraging developers to be more virtuous in terms of development. Google has the same reasoning with the Play Store, favoring the ranking of the lightest applications. So, yes, even a “general public” application used only from time to time must be optimized to consume the least battery possible. By avoiding that your application appears as “energy-intensive”, you improve its indexing, retention and in fine the user experience. Many factors key to the success of your app.

Battery life, hardware selection criterion

Any smartphone user has already faced a critical situation because of a very low battery level: no way to be reached anymore, an address impossible to found right before an important meeting, no train or plane ticket to show the controller… The – almost – vital need to maintain a fully charged battery has become a true concern for half the world population.

Hence, it isn’t surprising that battery life is one of the main selection criteria for buyers. Manufacturers are constantly working on improving the efficiency of batteries and hardware. And the technology press follows closely the subject.
While waiting for a hypothetical new and ideal technology, solutions regularly emerge. The range of applicative “solutions” allowing the optimization of battery consumption is very wide on the different stores, however with no strong impact on battery life improvement. Facing this, users fall back on palliatives: USB battery extensions (“power banks”), mini solar panels,… many accessories adding up to the initial budget and cluttering up bags.

In spite of all that, the « low battery anxiety » phenomenon keeps rising.

Aren’t manufacturers doing something?

This issue is well known from manufacturers. Indeed, improving battery life is a true challenge operating at the level of every single component: of course batteries, but also size and screen technology, choice of electronic components, their complete integration, and software layers. Manufacturers integrate OS (like Android), develop drivers for electronic components but also develop applications for users, by creating them or adapting AOSP Android applications.

But why working on applications?

Well, simply because the hardware platform is not the only cause of battery discharge. Software layers are not innocent in this issue, far from it actually. If we think about it a bit more, it is normal! Here is an example of a simplified curve representing the energy consumption during the loading of an application:


We can see the overconsumption caused by the launch of the application.

As you might know already, all applications don’t have the same impact on the phone’s overall battery life. Here is the comparison of consumption when launching an e-commerce application, which basically doubles:

The use of features such as GPS, Bluetooth or video (or in the near future AR or VR features) has an impact, but it is not the only cause of inequalities. Indeed, depending on the design, use, external services, sensors it will solicit… an application will consume more or less.

Unfortunately (or fortunately), applications do have a strong impact on our smartphones’ battery life.

Applications’ impact, a major criterion

Manufacturers are aware of this applications’ impact. They work on optimizing their own applications, but have no power on applications installed on the phone once it is out of the factory… It starts with phone operators or integrators, who add their own applications to the device. Then users install whatever they want. All these applications will have a more or less important impact on battery life. In the end, even if the manufacturer isn’t directly responsible, the user will associate the poor battery life of the device with the brand and the phone’s model: 71% of users consider that the quality of an application can have influence on the brand image (Source: baromètre des usages mobiles ,Juin 2017, EBG).

As a consequence, it is in the manufacturers’ best interest to encourage applications editors to control their apps’ battery consumption. In the same way, it is in Google’s interest to promote virtuous applications on the Play Store, so that it reflects a positive image of the Android ecosystem, in comparison with Apple’s… and vice versa.

What are manufacturers doing? They report you to users.

Manufacturers should find interests in sensitizing users to this complex battery life issue and making the applications designer take the fall.

For example, let’s cite Huawei which now sends out explicit notifications to its users in case of a detected overconsumption:

This same will to promote energy-thrifty applications is now integrated in Google and Apple ecosystems. It has been a while now that platforms don’t hesitate pointing at energy-intensive applications. In order to do that, the system lists each application’s share of consumption:

Android 8.10 Oreo latest version reinforces this functionality by adding a notification of consuming applications :

But this reasoning isn’t just limited to the user’s phone as we can also find it on the stores. That way, Google takes into account consumed energy in its ASO indexing criterion for applications.
You probably know by now that efficiency is key for a good SEO, and Google confirms it also is for applications (ASO). It is a criterion you cannot neglect since 80% of users use the store as entry point for their application search (Source: baromètre des usages mobiles, Juin 2017,EBG).

Want an example? Google explains what Busun went through, which is going from a 4.1 to a 4.5 rating by improving its performance.

What does the user do?

Let’s suppose the user found your application on the store, was convince to install it, well now remains the hard part: retention of the app. Either your app belongs to the dozen of “critical” must-have applications with no real equivalent (Google Maps, Facebook…): in that case the user accepts the battery consumption as necessary, he/she complains but will keep your app.

Or, your application belongs to the millions of other apps, considered non-essential – or with numerous alternatives (online banks, informative press, etc): in this case, the user will be quick to uninstall your app to switch to your competitors’. And he/she may even leave a bad rating or mean comment to your app on the store.

Conclusion

General public applications owners sometimes think the impact of their app on the device’s battery life isn’t an issue. After all, it is only used from time to time; it is not necessarily that ONE application that is discharging the whole battery, right? Well, we saw it isn’t true. Even a general public application can strongly be impacted by a behavioral default. And users WILL realize it: degraded indexing, low retention, negative comments… The success of an application also comes from the good management of its efficiency.

Android Memory: the Ultimate Metric Guide

Reading Time: 5 minutes

Because we care about your applications efficiency, we introduce you to the ultimate metric guide to manage your application’s memory on Android devices.

Memory syllabus

Pages: Blocks used to retrieve data from disk to memory. Main part of virtual memory management. Most of the time page size is 4kb.

Private / Shared memory: Private memory is composed of pages that are only used by the process. Shared memory is composed of pages which are used by other processes. It is possible that a page goes from private to shared if another process references this page.

Clean / Dirty memory: Dirty pages are pages that are written out to the disk. Hence, clean pages are pages that have been read.

VSS (Virtual Set Size): It is the total number of pages accessible by a process. It includes both shared and private pages, but also other memory space like malloc. Not used.

RSS (Resident Set Size): Total of all shared libraries. No information on how many processes use the page. Thus, not a very useful information (PSS is more important).

Pss (proportional set size): It is the count of pages a process has in memory, in which private pages are added to shared pages and divided by the number of processed that share it. If a process has 2 private pages and 6 private pages used by 2 others processes, the pss in number of pages is 2+6/3 so 4.

Uss (Unique set size): The number of unique pages associated to a process, meaning private pages! Generaly VSS > RSS > PSS > USS

Java / native memory: Java memory is the memory managed by the Android System (Dalvik or ART). Typically your Java or Kotlin objects! Native memory is usually generated object. Even if you have no C/C++ application, the Android framework uses some native method.

ZRam: Android has no swap partition, Zram is RAM but compression is used to store unnecessary data to RAM. Swapped dirty in meminfo seems to be equivalent.

Stack / heap: Heap is the object memory space. Stack is for local variable. As a result, objects are created in Heap. Every thread has a stack space.
Allocated Heap Size : Android is a multitasking system, in order to save memory for other processes, it allocates a memory size in the overall memory. This size depends on the smartphone. If your application needs more memory, you will have a typical “out of memory” error.

MMAP: System calls that map file to memory. In Android you have mmap for each type of file (Dex, APK, ART…). It can be named “Code” in some tools.

Graphics Buffer: Memory used to store graphical objects.

User/Kernal memory: Process runs in user space. Kernel space is dedicated to Android system calls.

Memory organization

Android Memory is organized with virtual addresses. Mapping is the following (Ascending address):

  • User Space
    • Data space (text, data, instructions…)
    • Heap
    • libs (Shared libraries, .jar…)
    • Stack
  • Kernel Space

The memory used by your application is in the user space (mostly in heap and stack).

Tools

Android system parameter: The information in the UI of Android gives two information : maximum consumption and average information (during 3 hours). The average is complicated to analyze and the maximum consumption is a first indication for the user.

Top: RSS and VSS are used, as a consequence information of Top are not so meaningful.

Memory Profiler in Android Studio (>3.0): Private memory only is measured and is divided in domains:

  • Native / Java
  • Code
  • Graphics Buffer

Android Monitor in Android Studio (<3.0): Private memory only is measured. Less domains are measured than in Android Memory > 3

Dumpsys: Dumpsys measure the PSS memory (both private and shared) and also SWAP dirty

Android MemInfo API: PSS memory is used (private and shared)

/proc/meminfo: Global memory of the platform, no information about your process

Which metrics must be used?

USS/private memory: This memory is dedicated to your process. Thus it is interesting to analyze precisely the object dedicated to your application. Also, you can detect a memory leak, for example, if you kill your process, the dedicated memory must be zero. Nonetheless, your application used libraries and other shared codes so you won’t see memory that can be shared with other processes.

PSS/Private and shared memory: It is more complicated to analyze this memory because it integrates the memory of other processes (with a correction factor). However, during your measurement, if you close other apps running in the background, this impact will be minimized.

VSS/RSS: Too many memory pages taken into account so this metric is not interesting to analyze.

How to test memory?

Static: You just have to run your application and launch the memory tools. It permits to get an overview of the memory consumption of your application. You can use this technique to reduce the overall memory used: code, java heap…

Long Running: You let the tools run and you observe the evolution of memory. That way, you can identify a potential memory leak: the memory can increase regularly. If there is a garbage collector which reduces regularly the memory down to the initial value it is OK, if not, there is a leak.

Switching between activities: You can go between pages and see if the memory is released every time. You can do that with monkey tests.

Rotating screen: If you rotate your screen, the activity of your application will potentially create a memory leak.

Put application in the background: If your application is in the background, some memory will be released (for example graphics). You can release more memory (object, library…).

How to reduce memory?

Optimize Image: Images are major causes of memory consumption. You can use Glide library to help you manage it or optimize the management with Android API

Release Memory when Android asks for more memory : As the system is low on memory, an event is sent to all applications to release memory. Override onTrimMemory() to release memory in this case

Use specific containers: Generic collections like hashmap are not dedicated to Android, some containers are more adapted, such as SparseArray

Reduce the size of your APK: The size of your apk (especially ressources and libraries) could increase the memory consumption

Reduce the number of threads: Android provides services to make small tasks and to avoid memory consumption, like AsyncTask

Favor static inner classes over non-static: Non-static inner classes create extraneous references to out activity. This is a cause of memory leak. You should choose static.

FAQ

How to know the heap limit size?: The heap limit size of Android depends on the device (15Mb to several hundreds). To know the limit size you can use the getMemoryClass() API of ActivityManager service.

Memory information is not the same between different tools. Why ?: Tools could be using different system APIs or could not take into account the same data (for example not to take MMAP). Generally speaking : Android monitor < Android Profiler in Android Studio < dumpsys < System Meminfo api < top info and VSS > RSS > PSS > USS

Will Android release my process memory during the background mode?: When the user changes the app, the system caches the app in a least-recently used (LRU) cache. As the system runs on low memory, it will kill consuming apps. If your app consumes less memory, it has some chances not to be killed (or at least after the more consuming apps)

Is it possible to increase heap size limit?: Yes, with the option android:largeHeap=true in the manifest. However, it is not recommended.

What is OutOfMemoryError ?: You application needs more space and you have reached the heap size limit.

Sources

https://en.wikipedia.org/wiki/Paging

https://stackoverflow.com/questions/2298208/how-do-i-discover-memory-usage-of-my-application-in-android/2299813#2299813

https://developer.android.com/topic/performance/memory-overview.html

https://forum.xda-developers.com/showthread.php?p=34877656#post34877656

http://javarevisited.blogspot.fr/2013/01/difference-between-stack-and-heap-java.html

https://developer.android.com/studio/profile/memory-profiler.html

https://developer.android.com/topic/performance/memory.html

Measuring the energy consumption of IoT: using Arduino to measure Raspberry!

Reading Time: 3 minutes

Battery life is one of the important criteria you must test during IoT (Internet of Things) development. Not measuring the energy consumption of your platform can lead to potential issues:

  • User dissatisfaction
  • Decrease in battery lifespan
  • Increase in platform maintenance cost

So, how can you measure energy?

We explained several times on this blog how to measure energy with software only, especially on Android. But measurement on IoT platforms is not so simple: there is no embedded energy probe, no API… You will need to conduct hardware measurements.

Electrical explanations

In order to measure energy consumption, you need to use a shunt. A shunt is a resistor which you put in your electronical circuit: when current go through the little value resistor, a differential voltage is created. Energy can be calculated with the Ohm law : Power = Voltage x Current.

There are two ways to integrate this shunt: high side and low side. High or low depends on where you put the shunt, depending on your battery or power inside. “High” is between the positive point of the battery and your load (your platform) and “Low” is between the battery ground and the ground of your platform.

Low side is simpler but presents some drawbacks, especially the platform with switching loads which create ground loop problems. It is generally the case for IoT, with sensor, controller etc… So let’s go for a measurement of the High side.

Rapid measurement of an IoT platform

Arduino provides a tutorial for measuring energy with an INA219 breakout board, with a 1 % precision.

Wiring is really simple if you use a breadboard and follow the Adafruit tutorial.

To test the installation, you can run an example. You will get four information:

  • Bus Voltage: this is the total voltage seen by the circuit under test. (Supply voltage – shunt voltage).
  • Shunt Voltage: the shunt voltage!
  • Current : the current derived via Ohm law and the voltage measurement
  • Load Voltage : the overall voltage

Measuring an IoT object

Now we can integrate the IoT platform, for that we have chosen a Raspberry. It is pretty amazing to measure a Raspberry with an Arduino!
The first difficulty is to insert the shunt between the battery’s positive power point and the Raspberry’s Vin. First possibility: you integrate it directly on the Raspberry board, by cutting the circuit. We chose a less intrusive possibility, by integrating it in the power cable. Raspberry is powered by the USB and we need to put the shunt between the V+ of the computer and the V+ of the Raspberry :

In real life, it gives:

You now have to run the code example and obtain the platform current and voltage!
For a Raspberry with no configuration (No OS, no card), I obtained an average of power of 230 mW.

Then, you only have to get your projects measures started! As an example, here is how I conducted the measurement of an Arduino weather station.

First steps with UI Automator

Reading Time: 4 minutes


UI Auto…what ?

Like its name states it, UI Automator is a framework provided by Android allowing to execute User Interface (UI) functional tests in an automated way.

This framework lets you interact with visible elements of a smartphone screen: click a button, fill a text field, scroll down, etc.
Thanks to UI Automator, you can, for instance, launch an application, fill a login field, navigate in menus…

Let’s write together a first test scenario with UI Automator !
Our objective here is humble: launching a video from the Youtube application on Android.

UI Automator, Espresso, Appium…

In the Android framework, you can also find Espresso: but what is the difference?

UI Automator is more “black box” oriented: you can test any application (even without knowing the code) or even access Android systems settings (like the configuration panel).
Espresso is more “white box” oriented: it requires having the code of the application you want to test, you can conduct finer assertions (for instance on activity creation in the application).

It also exists tools such as Appium, but they aren’t integrated in the Android framework. They offer more features and additional bastraction layers. However, this implies a certain level of implementation complexity.

You would have probably guessed it by now, UI Automator is, for us, the simplest and most-suited framework to begin with!

First step: implementing the work environment

UI Automator tests belong to the instrumented tests group: they must be executed on a smartphone or on an Android emulator.
During a test, two APKs run in a same process; a first APK for the application to be tested and a second one for the test itself.

Thus you need an application (and a scenario) to test!

The source code of an Android application is usually organized as exposed here below:

module
|---src
    |---androidTest
    |---main
    |---test

First case: you are the developer of the application to test.
The simplest solution consists in developing tests in the same module as the application.
The main file contains your application source code and the androidTest file has your UI Automator tests.

Second case: you don’t have access to the source code of the application to test.
You need to create a new module: the main file will be empty and the androidTest file will contain your UI Automator tests.

In the module’s build.gradle file, add the following settings (UI Automator works with AndroidJUnitRunner) :

android {
    ...
    defaultConfig {
        ...
        testInstrumentationRunner "android.support.test.runner.AndroidJUnitRunner"
    }
    ...
}
dependencies {
    ...
    androidTestCompile 'com.android.support.test.uiautomator:uiautomator-v18:2.1.2'
    androidTestCompile 'com.android.support.test:runner:0.5'
}

After making sure the project compiles correctly, it is time to add a new class in module/src/androidTest:

@RunWith(AndroidJUnit4.class)
public class YouTubeTest {
    @Test
    public void watchVideo() throws Exception {
        // TODO
    }
}

Everything is now ready for the test scenario implementation!

Second step: writing tests

A few precisions before getting started…

UI Automator allows to interact with visible elements of the screen.
Each element owns a certain amount of characteristics, including: content-description, class, resource-id, text.

UI Automator enables you to look for an element including a given characteristic.
For instance, to access the validate button displayed on the screen, you can look for the element which characteristic text means validate.
You can also get more specific, for example: the element which class is android.widget.EditText and which content-description is text_name.

The characteristic(s) used to find an element is/are rather important.
For example, watch out for names, particularly if your application is available in several languages!

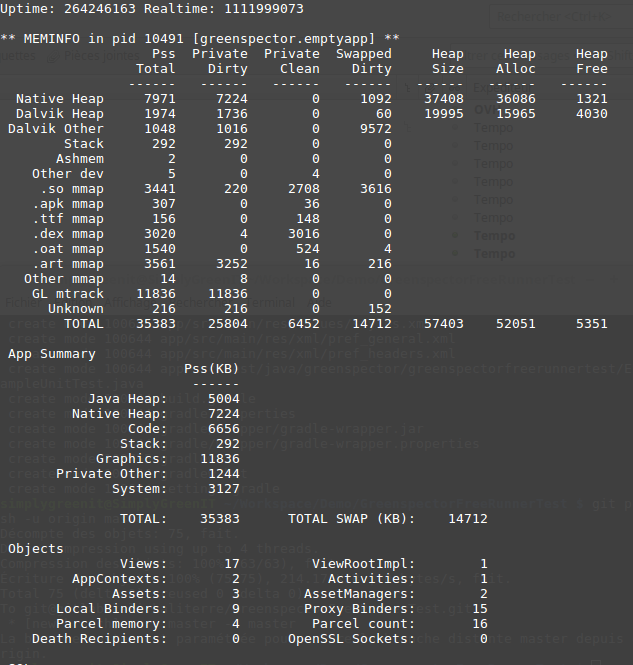
In order to know the characteristics of elements visible on the screen, the Android tool uiautomatorviewer (that you can find under the tools file of your SDK Android) is very convenient.
Once it is launched, this tool allows you to screenshot screens of an Android smartphone.
Each screenshot is associated with a tree represesenting the hierarchy of visible elements, with their respective characteristics.

But let’s go back to our test scenario, for which we propose the following actions:

  • launch the Youtube application;
  • click on the magnifying glass icon to initiate a search;
  • indicate the text “greenspector” in the search field;
  • launch the video “Power Test Cloud – Greenspector (FR)” ;
  • watch the first 20 seconds of the video.

Before initiating any interaction with elements on the screen, you should instantiate a UiDevice object which will represent the current state of the smartphone’s screen.

UiDevice mDevice = UiDevice.getInstance(InstrumentationRegistry.getInstrumentation());

Let’s start by launching the Youtube application, like described in the Android documentation.
The purpose of this article being to demonstrate some of the most simple UI Automator features, this step isn’t detailed.

The next step consists in clicking on the magnifying glass icon to initiate the search.
After spotting the magnifying glass resource-id thanks to uiautomatorviewer, we use the waitForExists method which makes the element clickable only from the moment it is displayed.

UiObject icon = mDevice.findObject(new UiSelector().resourceId("com.google.android.youtube:id/menu_search"));
icon.waitForExists(TIMEOUT);
icon.click();

We then use the setText method to enter the desired search keyword.

UiObject editText = mDevice.findObject(new UiSelector().text("Search YouTube"));
editText.waitForExists(TIMEOUT);
editText.setText("greenspector");
mDevice.pressEnter();

Previously, we only used one criteria to search elements on the screen.
But it is possible to combine a few (if different characteristics have the same values for several elements), for instance:

UiObject video = mDevice.findObject(new UiSelector()
        .resourceId("com.google.android.youtube:id/title")
        .text("Power Test Cloud - Greenspector (FR)"));

Finally, let’s wait a few seconds and watch the beginning of the video.

synchronized (mDevice) {
    mDevice.wait(20000);
}

Third step: executing tests

In order to execute tests, it is necessary to be connected via ADB to a smartphone (either a “real” physical smartphone, or an Android emulator). Launch can be executed directly from Android Studio, or in command-line with ADB.

First case : Android Studio.

Go on the Run menu, then Edit Configurations.
Click on the + sign to add a configuration, select the Android Instrumented Tests model.
Adapt configuration with the module name to be tested, the test type, the smartphone (real or emulator).

Second case : command-line with ADB.

First off, compile the application and the tests, for example by using the Wrapper Gradle assemble and assembleAndroidTest tasks:

$ ./gradlew clean assemble assembleAndroidTest

Then install the generated .apk files on the smartphone:

$ adb install module/build/outputs/apk/module-debug.apk
$ adb install module/build/outputs/apk/module-debug-androidTest.apk

Lastly, launch a test:

$ adb shell am instrument com.package.test/android.test.InstrumentationTestRunner

Conclusion

Voilà! Our goal is reached for this easy first UI Automator test, now it is your turn!

Go further

Android Documentation on UI Automator.

Android Documentation on ADB.